Builds
Overview
The Build system is a new approach to the execution process that separates project code preparation from Plan execution.
Instead of relying on a forced system process that prepares or rebuilds the project code during every scenario execution, users can create a Build in advance and assign it to a Plan, so each scenario execution uses the selected prebuilt version of the project. The main purpose of this is to speed up test execution by separating the build process from the execution flow.
Builds are managed at the Project level and are created based on the selected branch. This means each Build is connected to the project code from a particular branch, such as main, develop, release, or any other branch available in the user’s repository.
Each project can have up to 6 Builds. These Builds can belong to the same branch or different branches, depending on the user’s testing needs.
For example:
- A user can create multiple Builds from the same branch when the branch code is updated.
- A user can create separate Builds for different branches, such as one Build for main and another Build for develop.
- Different Plans under the same Project can use different Builds, allowing users to execute different prepared versions of the test code.
This structure gives users more control over which version of the project code is used during Plan execution. It is especially useful when different Plans are related to different branches, or when users want to avoid rebuilding the project during every execution.
Previous Structure (before builds)
Before the Build structure, the system prepared and built the project code during each Plan execution.
When a user started a Plan run, the system handled the required preparation and build steps as part of the execution flow. This meant that every execution included both:
- Building/preparing the project code
- Running the test scenarios
Because the code was rebuilt during each execution, the overall execution process could take significantly longer, especially for projects with longer build or dependency preparation times.
This impact was more visible in One-by-One execution mode. Since scenarios are executed independently in this mode, the system could repeatedly perform build or preparation steps for separate scenario executions instead of using a previously prepared Build. As a result, users could experience longer waiting times before and during test execution.
How Builds Work
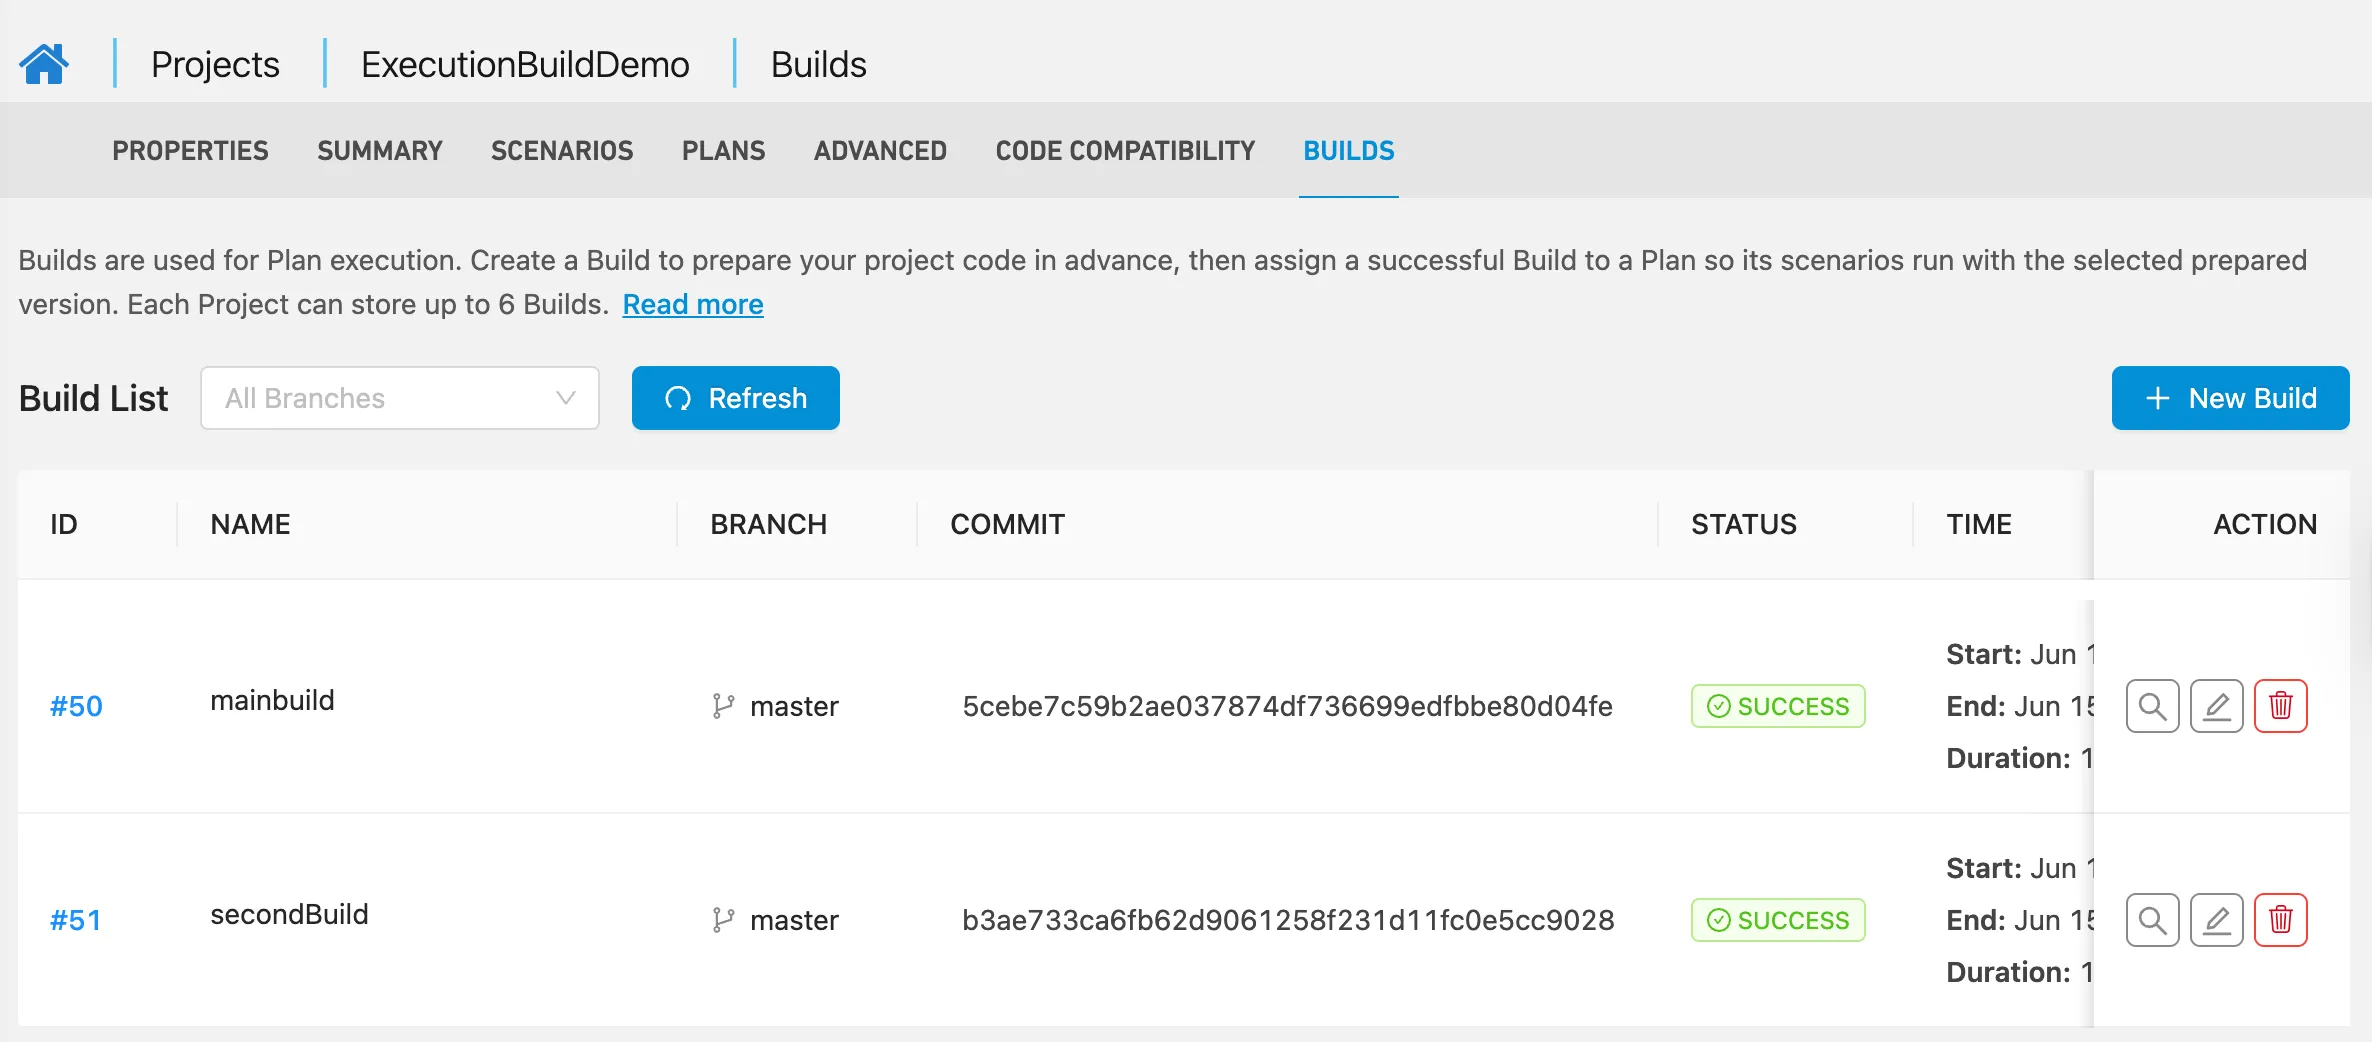
Builds are managed at the project and branch level.
A user can create a Build for a selected branch of a project. After the Build is created successfully, it becomes available for selection in Plans that belong to the same project.
The general flow is:
- The user opens the related project.
- The user goes to the Builds section.
- The user selects the branch.
- The user creates a Build for that branch.
- The created Build becomes available for use in Plan configuration.
- The user selects the Build in the Plan.
- When the Plan is executed, the selected Build is used.
This means the project preparation step is completed before the Plan run starts.
Builds help users:
- Reduce preparation time during Plan execution
- Have better control over execution setup
- Avoid relying only on the default project preparation flow during execution
Create Build
Users can create a Build from the project detail page.
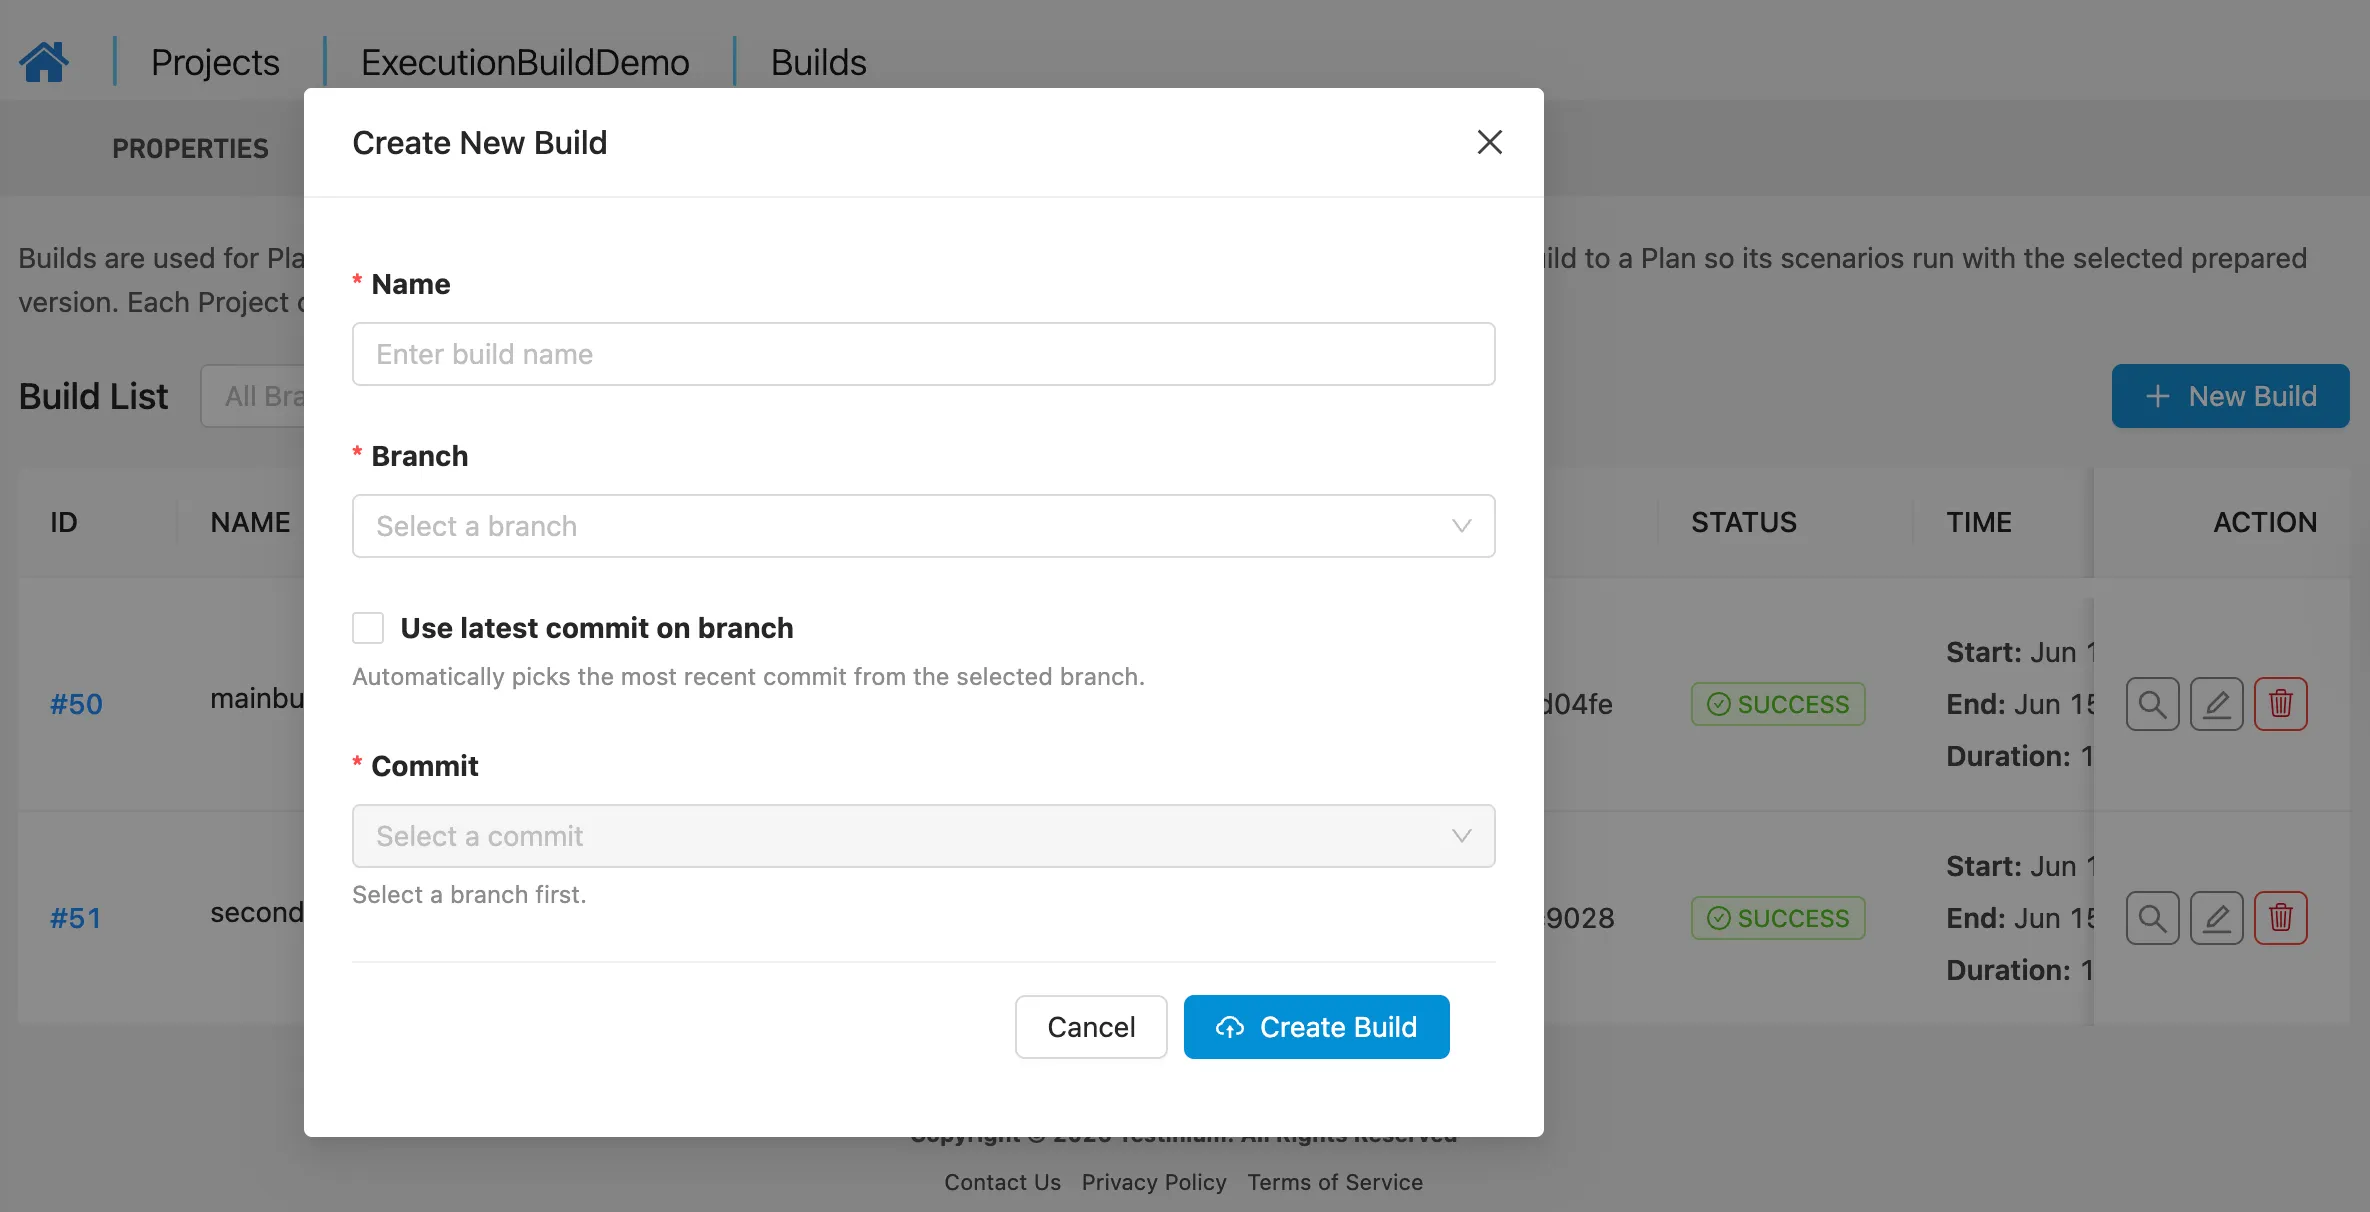
To create a Build:
- Open the related Project.
- Go to the Builds tab.
- Enter build's name
- Select the branch
- Select the commit for which the Build will be created.
- Click Create Build.
- Wait until the Build process is completed.
- Once completed successfully, it can be selected in the Plan configuration for execution
Each Build is created for a specific project and branch.
Users should create a new Build when:
- The user wants to run a Plan with the latest prepared version of the project (latest commit)
- A new branch needs to be tested
- A specific branch version should be used in a Plan
Using a Build in Plan
After a Build is created, it can be selected in the Plan configuration.
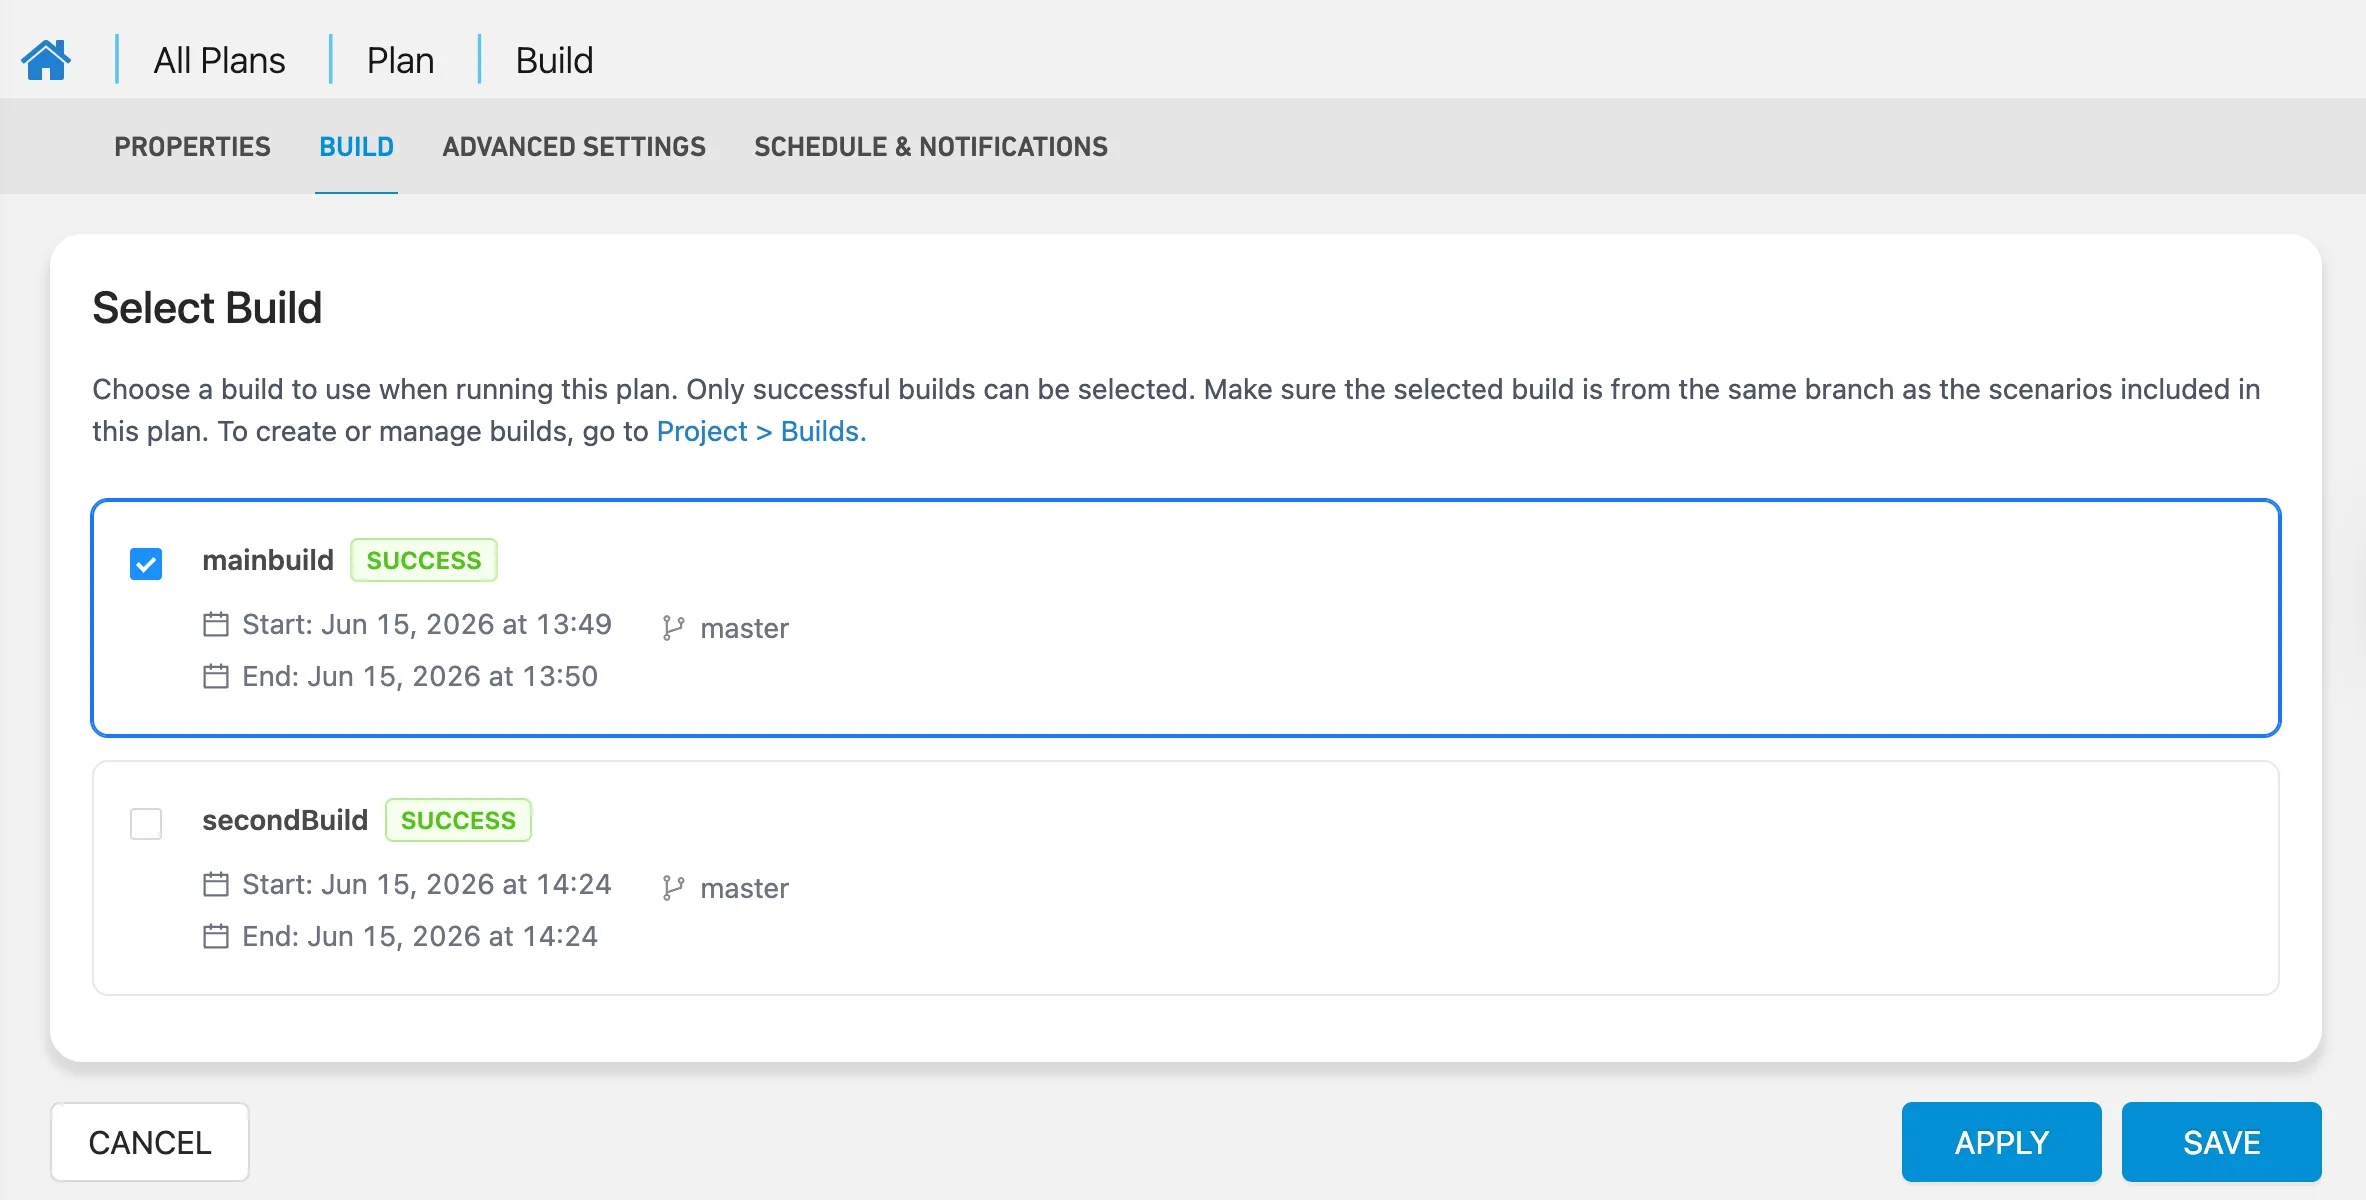
To use a Build in a Plan:
- Open the related Plan.
- Go to the Plan edit page.
- Select the Build that should be used by the Plan.
- Save the Plan.
- Run the Plan.
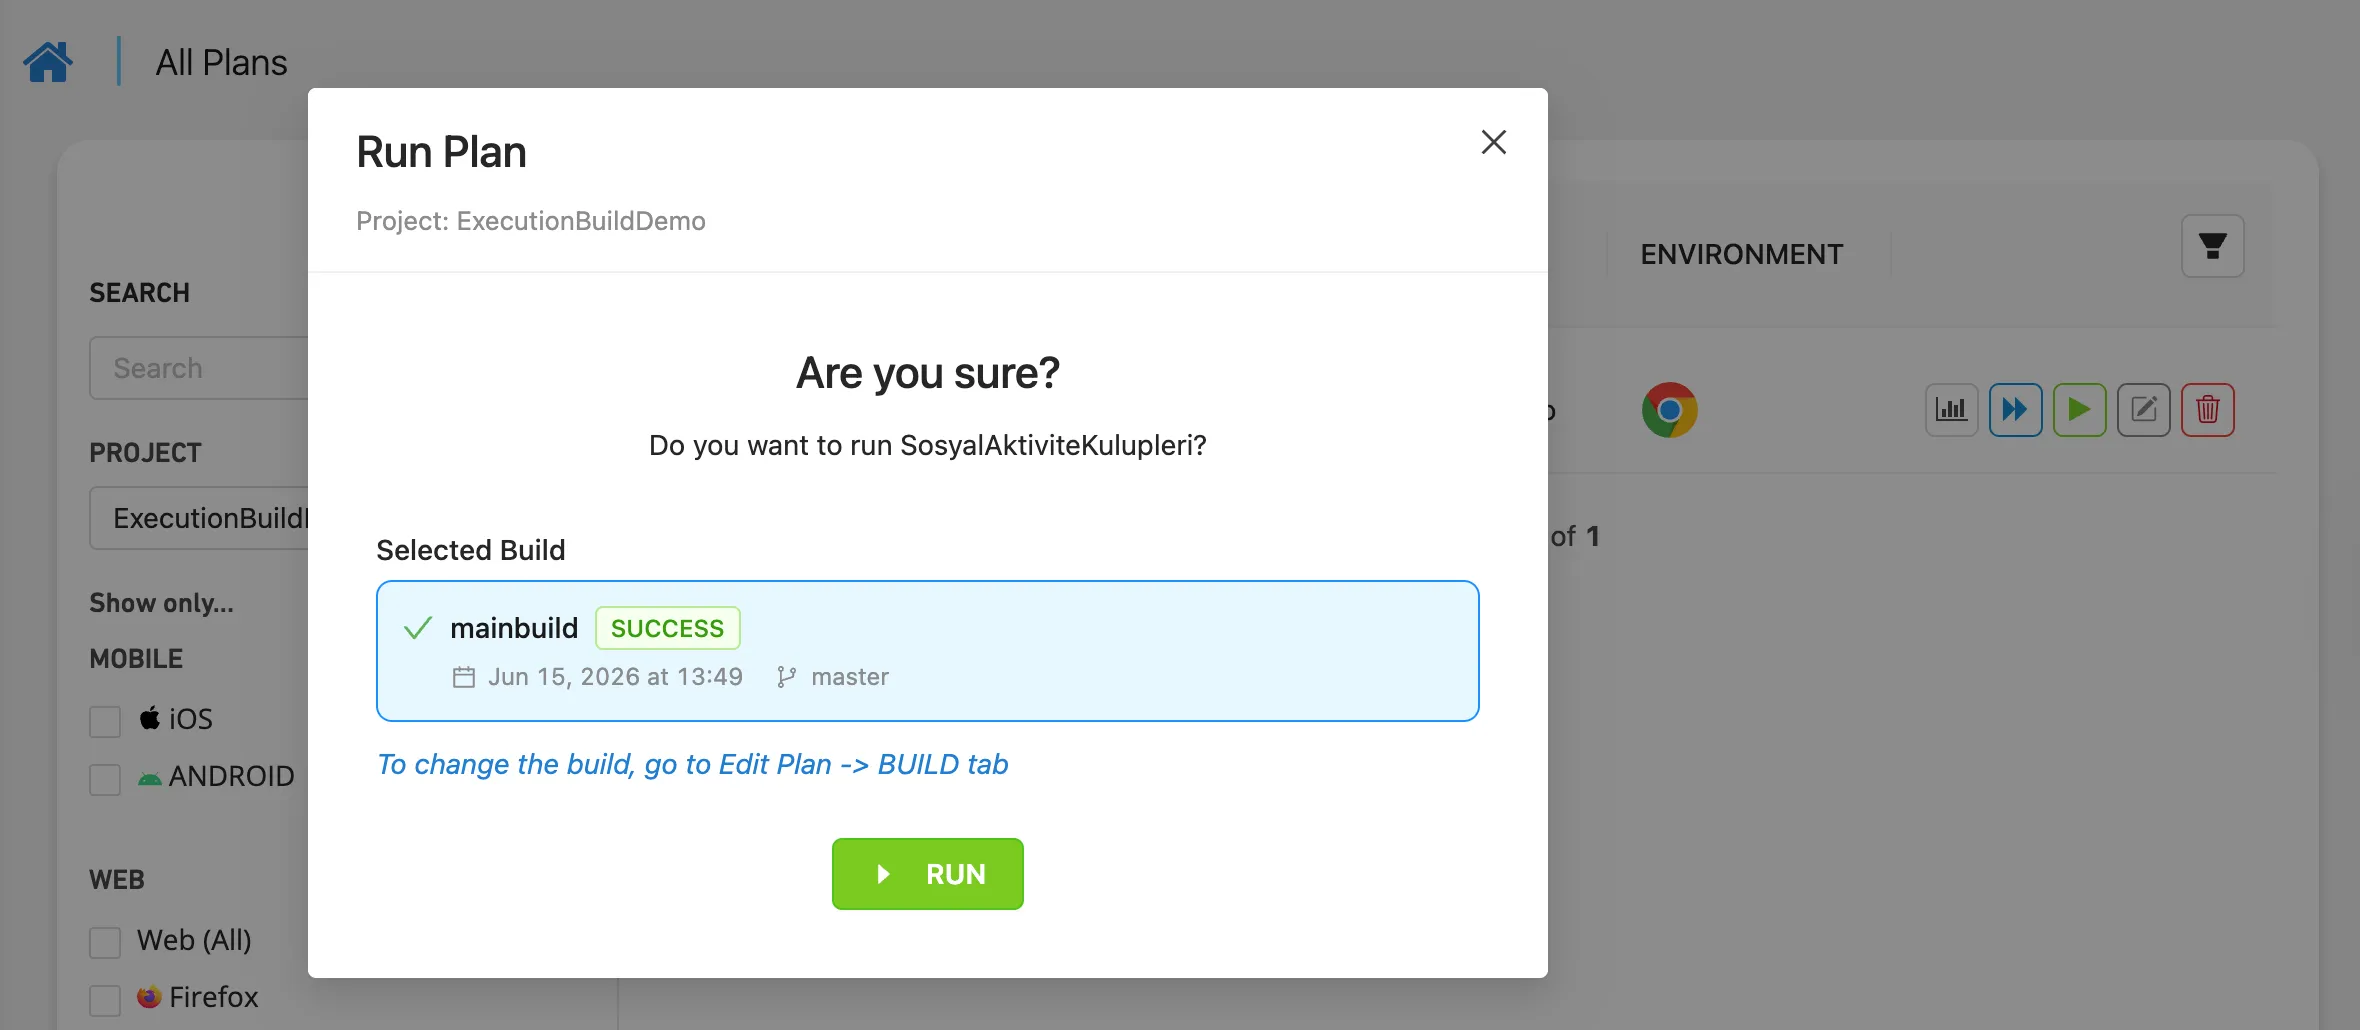
When the Plan is executed, the selected Build will be used during the execution.
This allows users to decide which prepared project version should be used for each Plan.
For example, if there are two Plans created from different branches, each Plan can be configured with the correct Build for its related branch. This prevents Plans from using an incorrect Build during execution.
The selected Build should belong to the same branch as the scenarios included in the Plan. Since a Build is generated from a specific branch, using it with scenarios from a different branch may cause version differences or unexpected execution behavior. To ensure a consistent execution, always select a Build that matches the branch used by the Plan scenarios.
Assigning Builds to Plans
You can also assign a successful build to one or more plans directly from the Builds page. Assigned plans use the selected prepared build during execution.
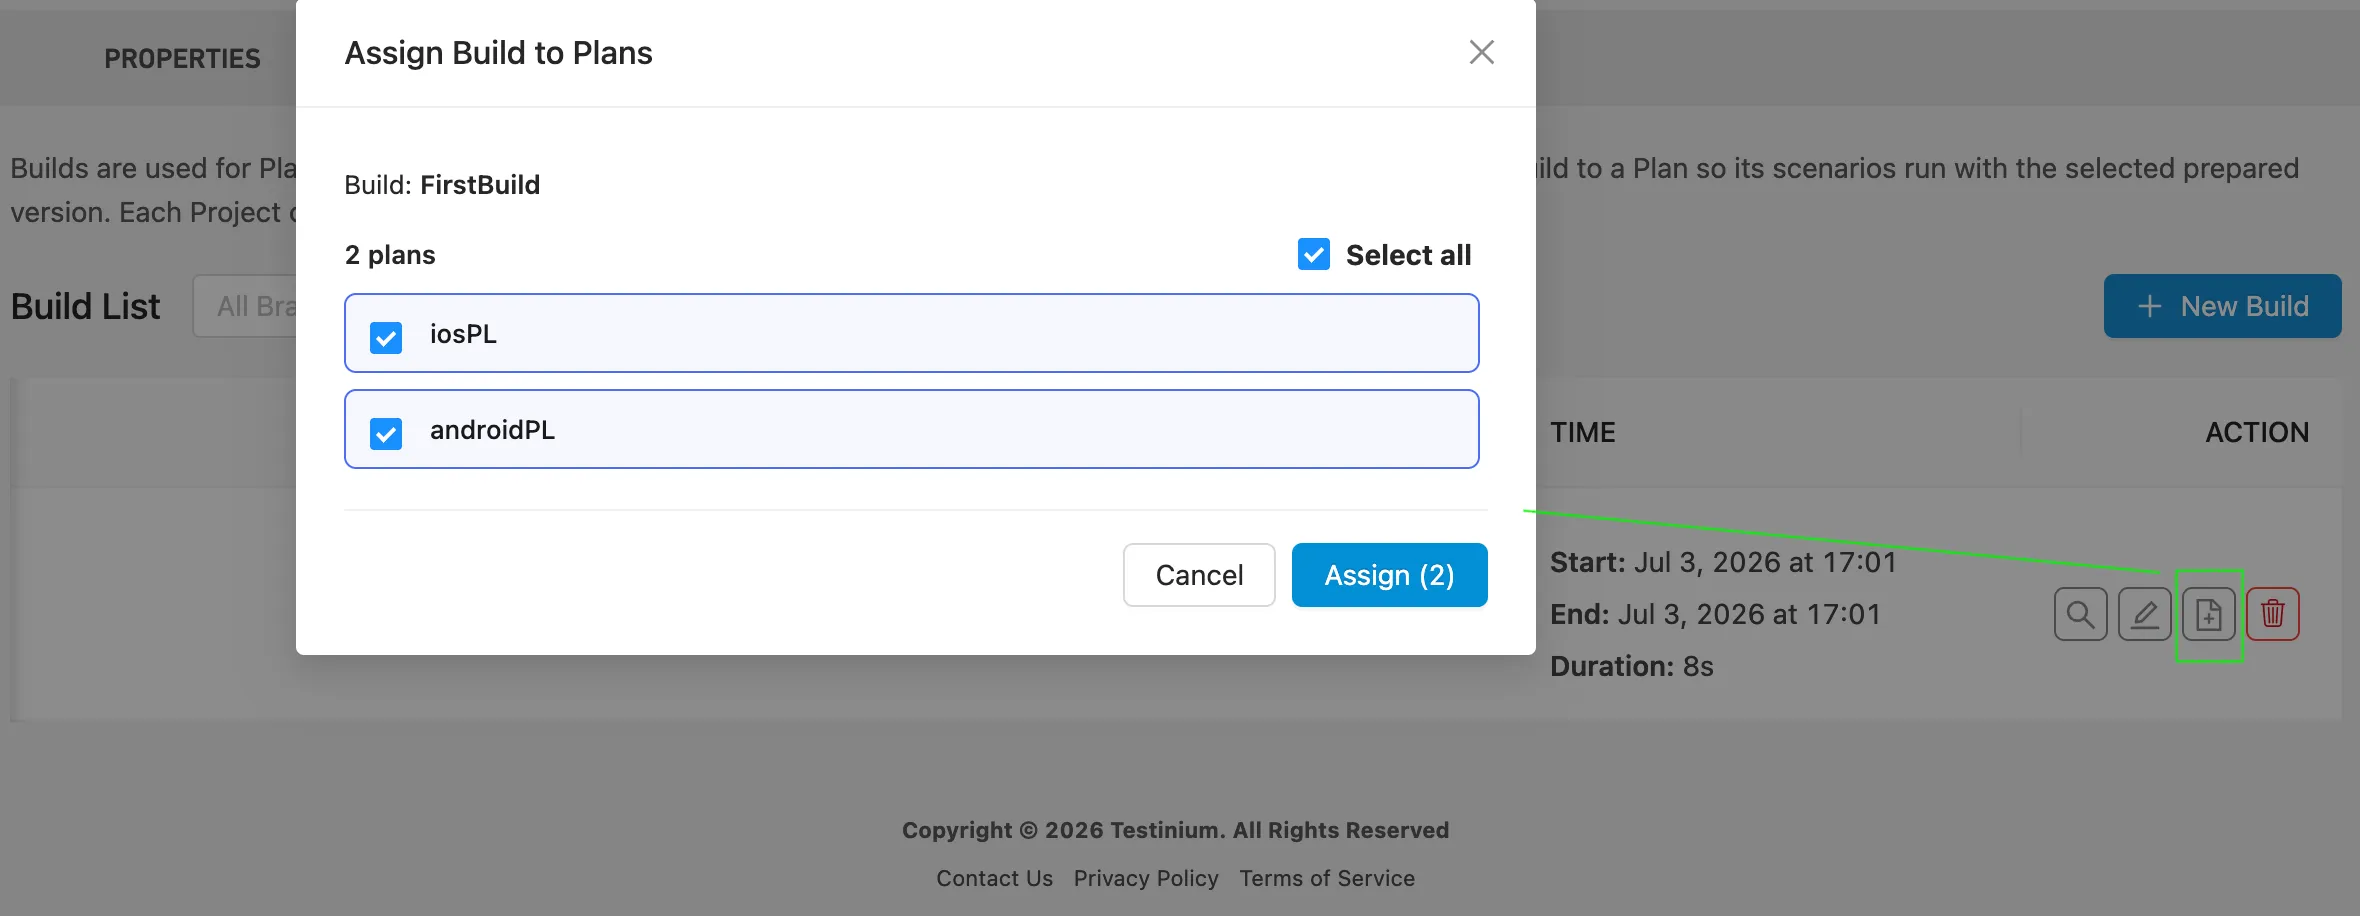
To assign a build:
- Click the Assign Build to Plans icon in the build’s Action column.
- Select the plans that should use the build, or use Select all.
- Click Assign to save your selection.
Only plans compatible with the build’s branch can use the build. An assigned build cannot be deleted until all plan associations are removed.
Important Notes
- Builds are created and managed at the Project level.
- Each Project can have up to 6 Builds.
- Builds are created based on the selected branch. A Build represents the prepared version of the project code from that branch.
- A Build must be created successfully before it can be assigned to a Plan.
- A Plan cannot be executed without selecting a Build. Users must assign a Build to the Plan before starting execution.
- Plans can only use Builds that belong to the same Project.
- Different Plans under the same Project can use different Builds. This is useful when Plans are related to different branches or different prepared versions of the project code.
- If the project code changes, it is advised that users should create a new Build to make sure the latest code is used during execution.
- If a Build is associated with one or more Plans, it cannot be deleted. To delete a Build, users must first remove all Plan associations related to that Build.